Supported Providers
pyramid_sna uses the OAuth2 protocol under the hood so it should be quite easy to support any Identity Provider that uses this protocol.
pyramid_sna does not store OAuth2 tokens anywhere and in every authentication flow it asks the provider for a new token, which is used to fetch user attributes.
At the moment, only Google, Facebook and Microsoft Live Connect are supported.
Google
In order to add a Login with Google button to your application you need to follow 3 simple steps:
- Register your applicaton at Google to get your API keys, add some branding information and tell Google where your callback URL is.
- Configure your application with the information obtained in the previous step.
- Write a callback function to process the user information that Google sends and create an authenticated session for that user.
Registering your application at Google
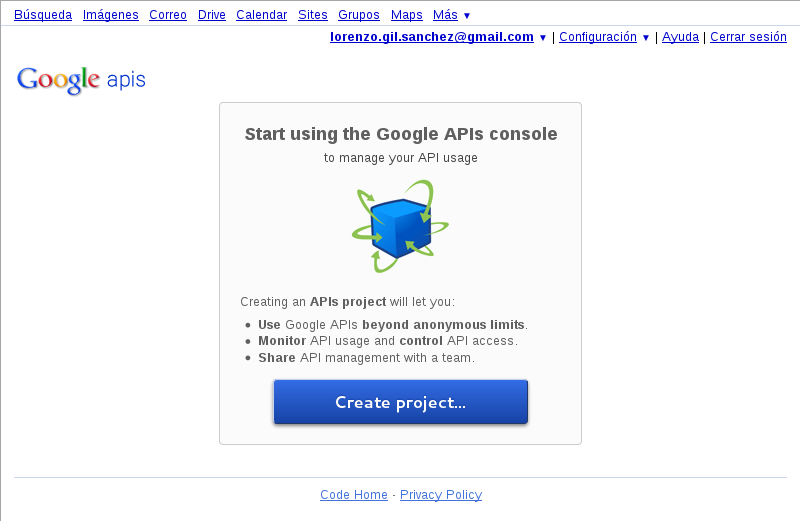
First you need a Google Account so create one if you don’t already have it. Authenticate yourself using that account and open the following link in your browser: https://code.google.com/apis/console/?api=plus
If this is the first time you use Google APIs console you will see the following page where you should click on the big Create project... button:
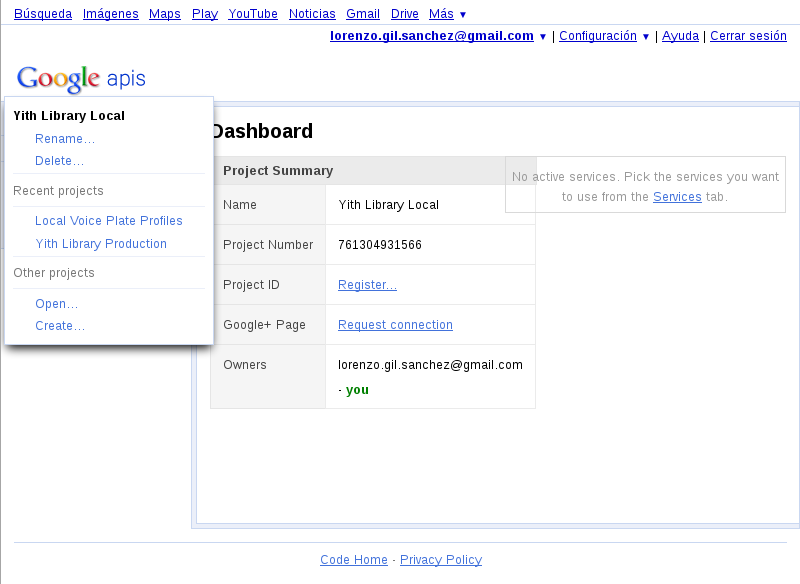
If you have registered more projects you will get to the default project page and you will have to open the dropdown button on the top left hand corner and click on the Create ... option:
If this is your first project and click on the Create project... button, Google will name it API project and will make it the current project. We recommend that you change that name using the Rename option in the menu of the top left hand corner.
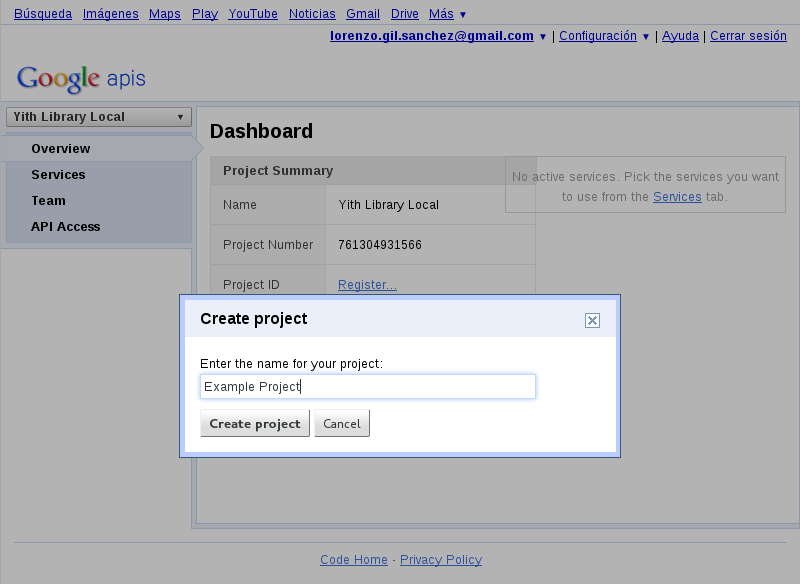
If this was not your first project and you selected the Create ... option of that menu, Google will ask you for a name in a little modal dialog:
In either case you will end up in the project home screen where a list of services is shown so you can enable or disable them for this particular project:
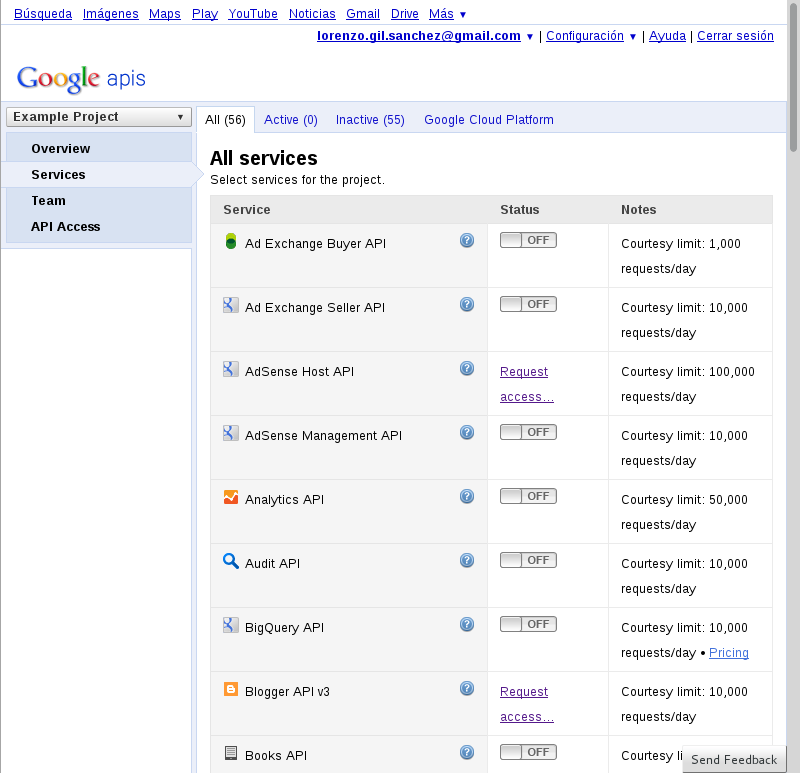
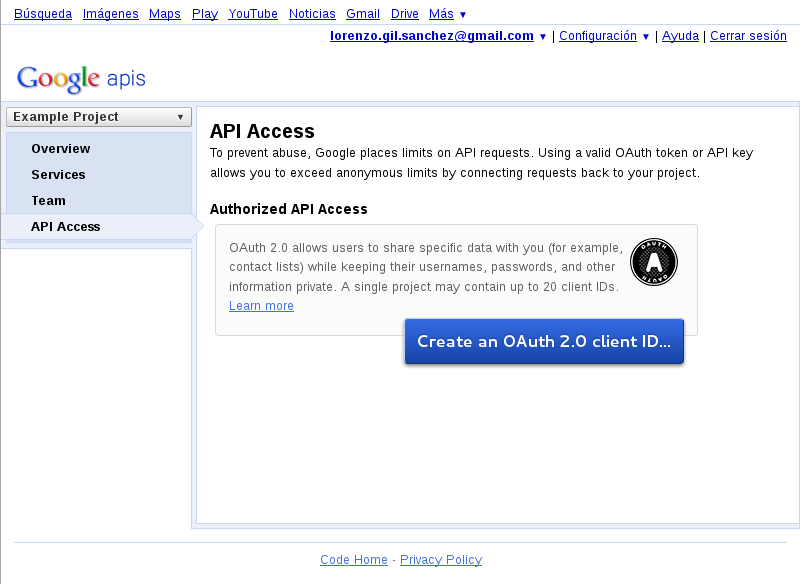
Since we are only using Google for authentication purposes we are not going to enable any of the services. Instead we will click on the API Access option of the left menu. This will take us to the API Access page where we can create an OAuth2 client ID:
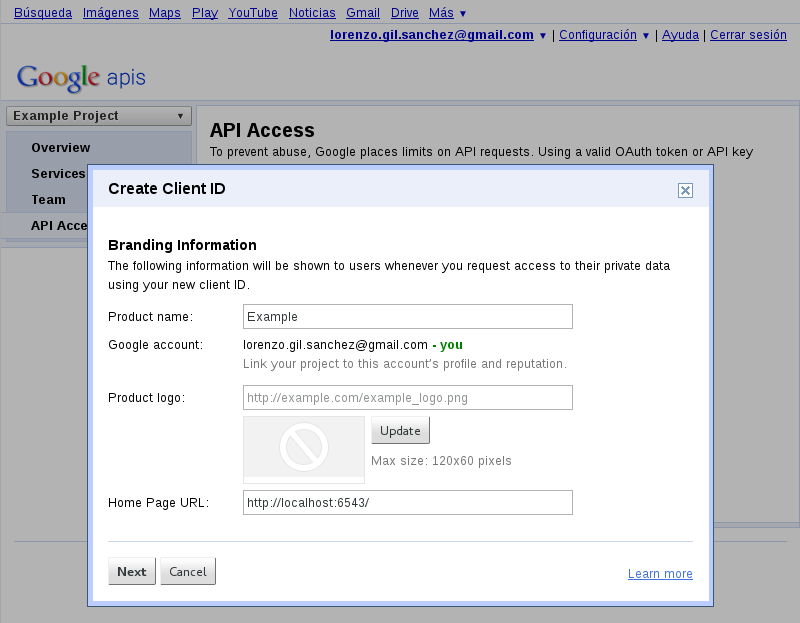
After clicking on the Create an OAuth 2.0 client ID... button a wizard composed of several dialogs will appear.
In the first dialog we will input the project branding information (Name, Logo URL and Home Page URL). The final user will see this information when logging in through Google into your application:
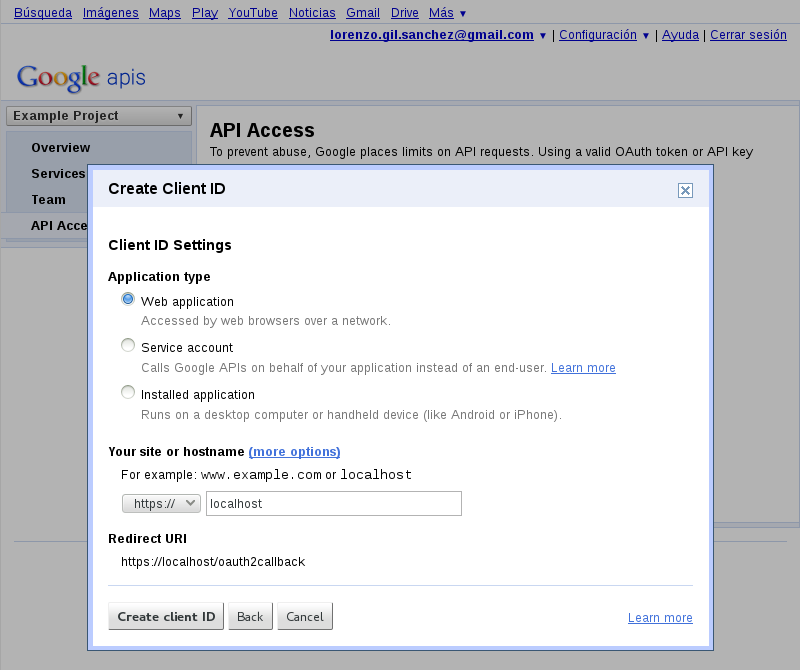
In the next dialog we will specify the application type and hostname. pyramid_sna needs the application type to be Web application, which is the default option for this setting in the Client ID Settings dialog. In the hostname setting you can specify the protocol (http or https) and the name of your host. For development you can enter localhost or 127.0.0.1 as the name of the host. We also need to change the Redirect URI setting but this dialog won’t allow us to do se. We’ll change it later.
After clicking on the Create client ID button you will see the API Access home page where all the information about this Client ID is shown:
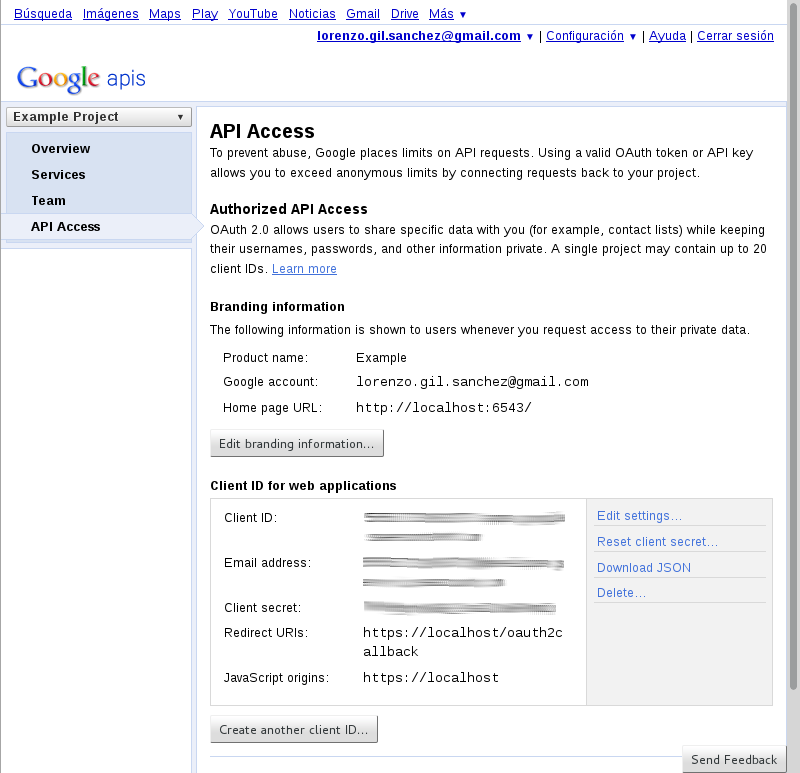
We are almost finished but first we need to fix the Redirect URIs setting clicking on the Edit settings... link on the bottom righ hand corner:
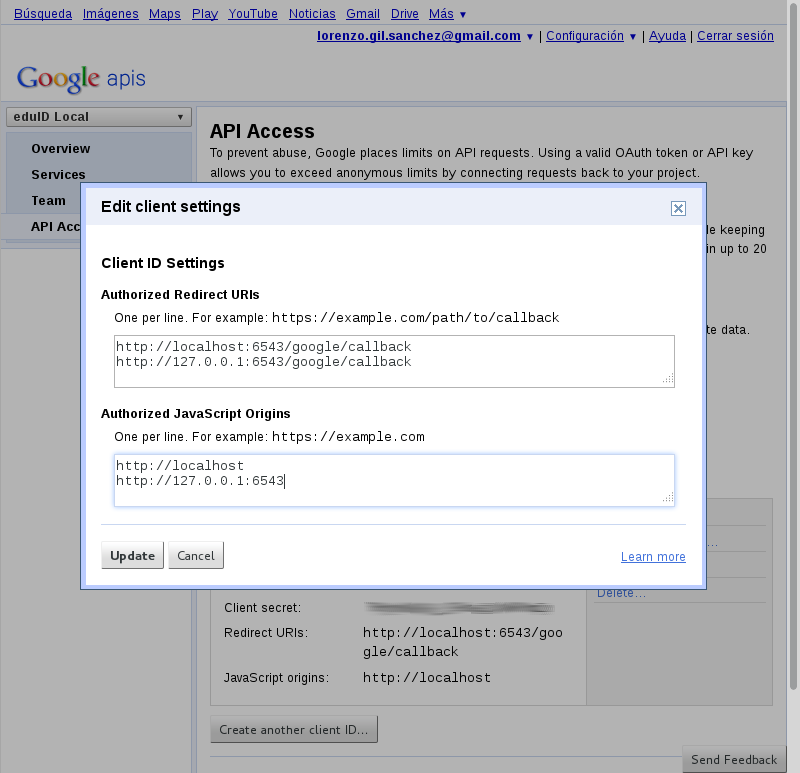
In this dialog we can enter as many URIs as we want for the Authorized Redirect URIs and Authorized Javascript Origins. In the image you can see sane values for development mode. Note that the hostname 0.0.0.0 is not valid for Google since it is too permisive.
Congratulations! you just finished registering and configuring your project at Google APIs console. You will need the Client ID and Client secret values in the next phase.
Configuring the settings
In pyramid_sna there are some required settings and some optional settings.
If any of the required settings is disabled a boolean setting called google_auth_enabled will be set to False. Otherwise it will be True.
Also if the required settings are missing the views that handle the authentication process (‘google_login’ and ‘google_callback’) will not be registered.
Required settings
There are 3 required settings:
- google_client_id this should be set to the Client ID value obtained while registering your project in the Google APIs console.
- google_client_secret this should be set to the Client Secret value obtained while registering your project in the Google APIs console.
- google_callback this should be set to the full path to a Python function that will be called after a succcessfull authentication. Check the next section Writing the callback function for more information about this function.
Optional settings
The following settings have sane defaults so you shouldn’t ned to change them in most cases:
- google_scope is space separated list of scopes. In OAuth2 a scope indicates what permissions are given to an application. The default scope includes the email and profile permissions: https://www.googleapis.com/auth/userinfo.email https://www.googleapis.com/auth/userinfo.profile Check Google documentation to learn about available scopes.
- google_auth_uri is the URI where the OAuth2 authentication endpoint is located. Its default value is https://accounts.google.com/o/oauth2/auth and you should not change it unless Google change it.
- google_token_uri is the URI where the OAuth2 token endpoint is located. Its default value is https://accounts.google.com/o/oauth2/token and you should not change it unless Google change it.
- google_user_info_uri is the URI where the user information endpoint is located. This is called by pyramid_sna to fetch user attributes after a successfull authentication. Its default value is https://www.googleapis.com/oauth2/v1/userinfo and you should not change it unless Google change it.
Example configuration
The following is an example configuration for the Google provider that will looks similar to what you should put in your .ini configuration file:
# Google authentication
google_client_id = 1234567890.apps.googleusercontent.com
google_client_secret = ABCDEFGHI_1234567890abcd
google_callback = my_project.sna_callbacks.google_callback
Please note that these are not valid values and you should not copy and paste them into your project. They will not work.
Writing the callback function
The callback function is called by pyramid_sna after a succesfull login with Google. The arguments that are passed to this function are the request object, the Google user id and a dictionary with user attributes (screen_name, first_name, last_name and email address). This function should return a Pyramid Response object which will be send to the user’s browser.
The typical things that a callback function does are:
- Create or update a user object in the application persistent storage.
- Call pyramid.security.remember to create an authenticated session for this user.
- Returns an HTTPFound object to redirect the user to an application view.
Example that persist the user in MongoDB:
from pyramid.httpexceptions import HTTPFound
from pyramid.security import remember

def google_callback(request, user_id, attributes):
    # Create or update the user in MongoDB
    user = request.db.users.find_one({'google_id': user_id})
    if user is None:
        user_data = {'google_id': user_id}
        user_data.update(attributes)
        user_id = request.db.users.insert(user_data)
    else:
        request.db.users.update({'google_id': user_id}, attributes)
        user_id = user['_id']

    # remember the user by sending a cookie
    remember_headers = remember(request, str(user_id))

    # return a redirect response to the home page
    return HTTPFound(location='/', headers=remember_headers)
Facebook
In order to add a Login with Facebook button to your application you need to follow 3 simple steps:
- Register your applicaton at Facebook to get your API keys, add some branding information and tell Facebook where your aplication URL is.
- Configure your application with the information obtained in the previous step.
- Write a callback function to process the user information that Facebook sends and create an authenticated session for that user.
Registering your application at Facebook
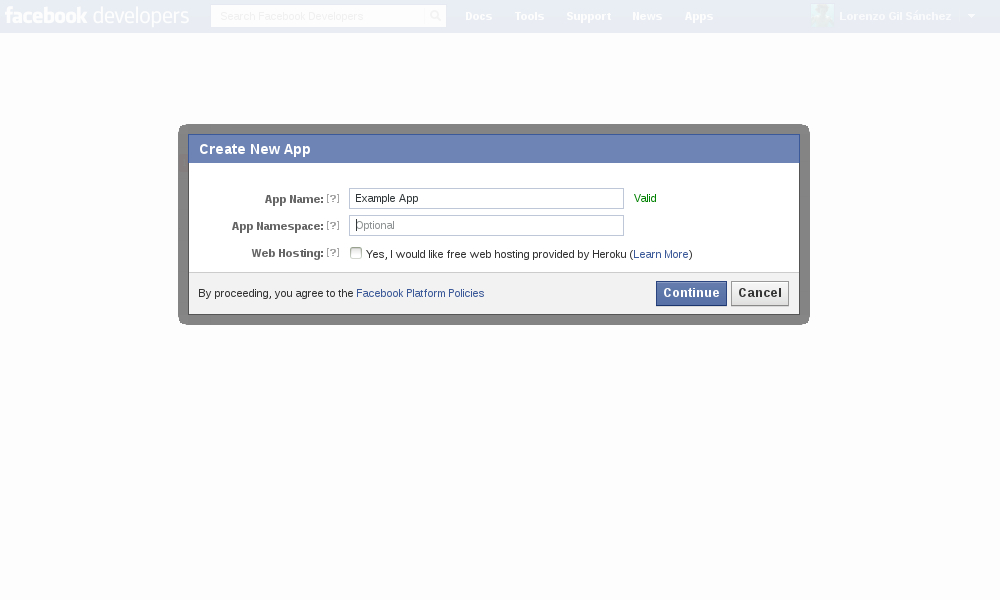
First you need a Facebook Account so create one if you don’t already have it. Authenticate yourself using that account and open the following link in your browser: https://developers.facebook.com/apps/?action=create
A dialog will appear asking your for the name of your application. Don’t worry about the App Namespace field. It’s optional and we will not need it.
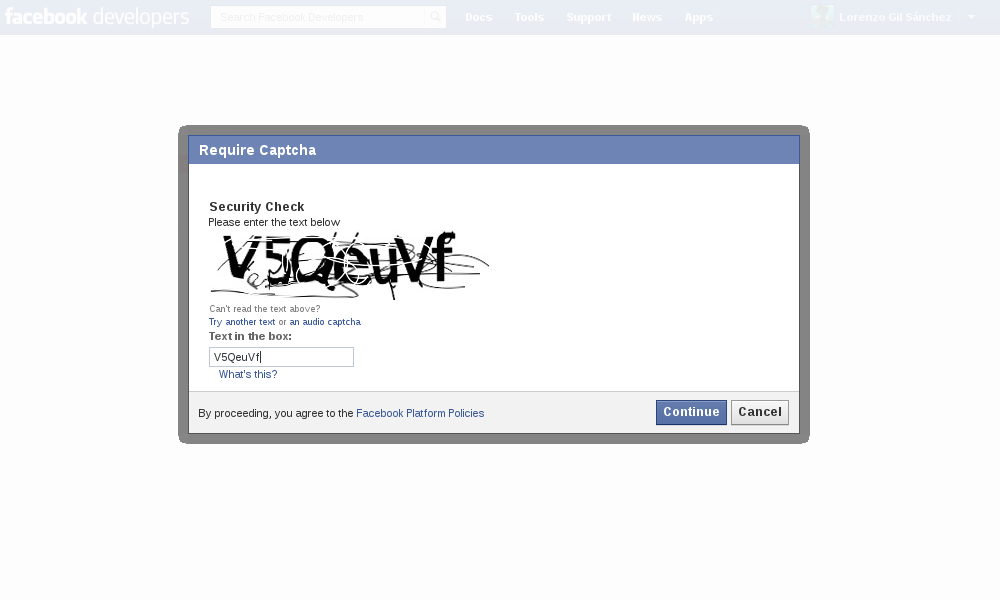
After you fill up the App Name field and click on the Continue button you will be prompted with a Captcha dialog, which you need to solve:
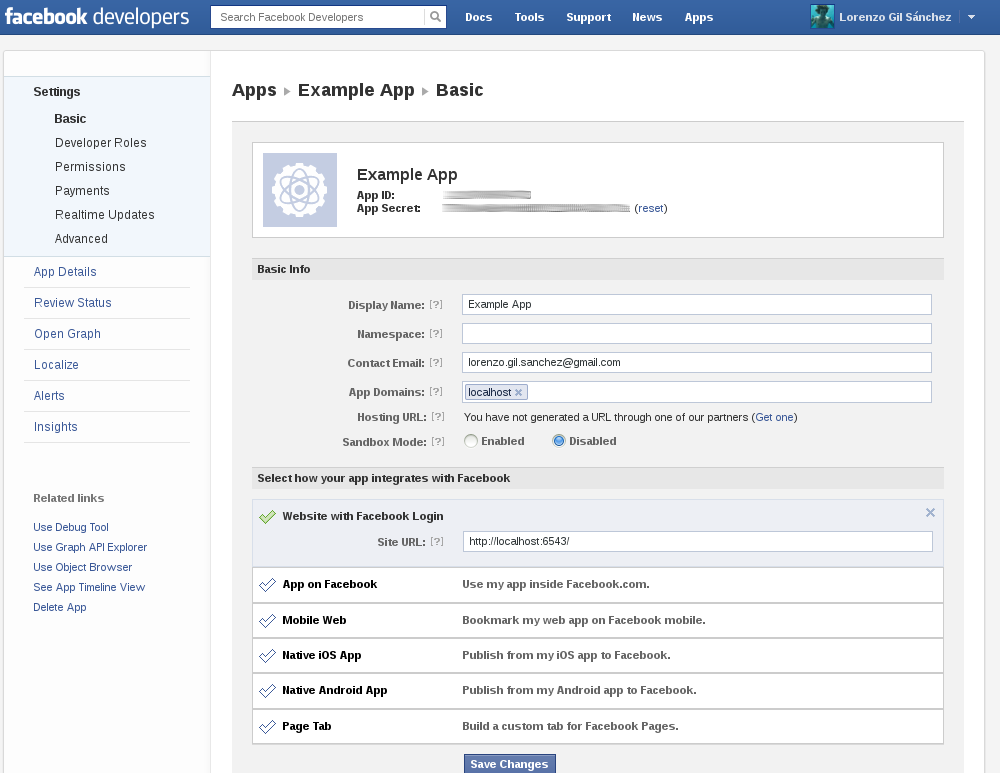
Then the application is created and you are redirected to the main application page where you can see a summary of all its properties. In this page there are three important things you need to do:
- Save the App ID and App Secret values because you will need them when configuring the settings of your Pyramid application.
- Set the App Domains field to the domains of your application. For development purposes you can enter localhost here.
- Select the Website with Facebook Login option and enter your site URL. If you are in development you can enter http://localhost:6543/
After these changes you have to click on the Save Changes button.
Configuring the settings
In pyramid_sna there are some required settings and some optional settings.
If any of the required settings is disabled a boolean setting called facebook_auth_enabled will be set to False. Otherwise it will be True.
Also if the required settings are missing the views that handle the authentication process (‘facebook_login’ and ‘facebook_callback’) will not be registered.
Required settings
There are 3 required settings:
- facebook_app_id this should be set to the App ID value obtained while registering your project in the Facebook Developers site.
- facebook_app_secret this should be set to the App Secret value obtained while registering your project in the Facebook Developers site.
- facebook_callback this should be set to the full path to a Python function that will be called after a succcessfull authentication. Check the next section Writing the callback function for more information about this function.
Optional settings
The following settings have sane defaults so you shouldn’t ned to change them in most cases:
- facebook_scope is space separated list of scopes. In OAuth2 a scope indicates what permissions are given to an application. The default scope includes the email permissions: email Check Facebook documentation to learn about available scopes.
- facebook_dialog_oauth_url is the URL where the OAuth2 authentication endpoint is located. Its default value is https://www.facebook.com/dialog/oauth/ and you should not change it unless Facebook change it.
- facebook_access_token_url is the URL where the OAuth2 token endpoint is located. Its default value is https://graph.facebook.com/oauth/access_token and you should not change it unless Facebook change it.
- facebook_basic_information_url is the URIL where the user information endpoint is located. This is called by pyramid_sna to fetch user attributes after a successfull authentication. Its default value is https://graph.facebook.com/me and you should not change it unless Facebook change it.
Example configuration
The following is an example configuration for the Facebook provider that will looks similar to what you should put in your .ini configuration file:
# Facebook authentication
facebook_app_id = 123456789012345
facebook_app_secret = abcdef1234567890abcdef1234567890
facebook_callback = my_project.sna_callbacks.facebook_callback
Please note that these are not valid values and you should not copy and paste them into your project. They will not work.
Writing the callback function
The callback function is called by pyramid_sna after a succesfull login with Facebook. The arguments that are passed to this function are the request object, the Facebook user id and a dictionary with user attributes (screen_name, first_name, last_name and email address). This function should return a Pyramid Response object which will be send to the user’s browser.
The typical things that a callback function does are:
- Create or update a user object in the application persistent storage.
- Call pyramid.security.remember to create an authenticated session for this user.
- Returns an HTTPFound object to redirect the user to an application view.
Example that persist the user in MongoDB:
from pyramid.httpexceptions import HTTPFound
from pyramid.security import remember

def facebook_callback(request, user_id, attributes):
    # Create or update the user in MongoDB
    user = request.db.users.find_one({'facebook_id': user_id})
    if user is None:
        user_data = {'facebook_id': user_id}
        user_data.update(attributes)
        user_id = request.db.users.insert(user_data)
    else:
        request.db.users.update({'facebook_id': user_id}, attributes)
        user_id = user['_id']

    # remember the user by sending a cookie
    remember_headers = remember(request, str(user_id))

    # return a redirect response to the home page
    return HTTPFound(location='/', headers=remember_headers)
Microsoft Live Connect
In order to add a Login with Microsoft Live Connect button to your application you need to follow 3 simple steps:
- Register your application at Live Connect Developer Center to get your API keys, add some branding information, supported languages and tell Microsoft where your callback URL is.
- Configure your application with the information obtained in the previous step.
- Write a callback function to process the user information that Microsoft sends and create an authenticated session for that user.
Registering your application at Microsoft Live Connect
First you need a Hotmail, Outlook.com or MSN Account so create one if you don’t already have it. Open the follow link in your browser: https://account.live.com/developers/applications/create?tou=1 and authenticate yourself using your account.
A simple form appear asking you for the name of your application. Pay attention to the name format indications in the Application name field. The name only can have letters, digits, underscore and it is limited to 129 characters.
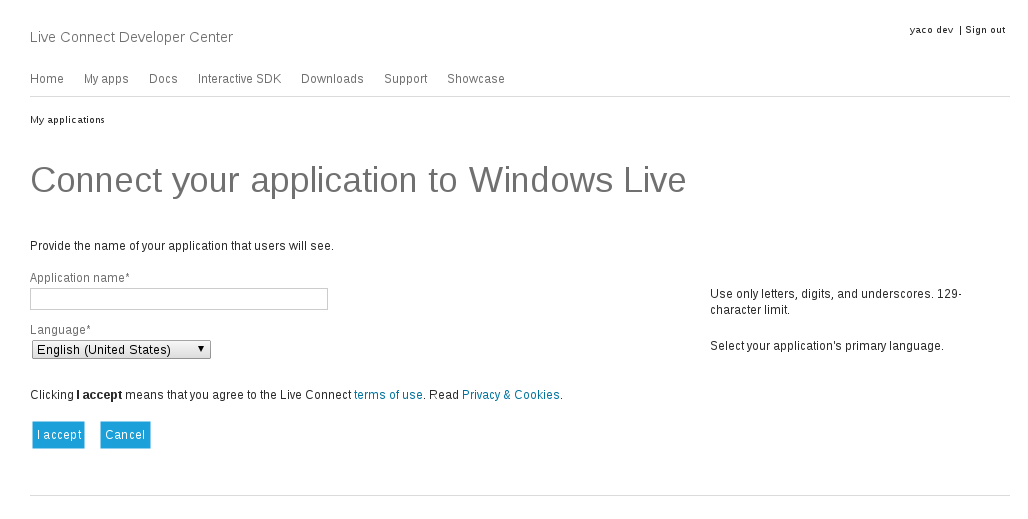
After you fill up the Application name field and you have selected the preferred language for your application, you should read the terms of use and Privacy & cookies and click on I accept button.
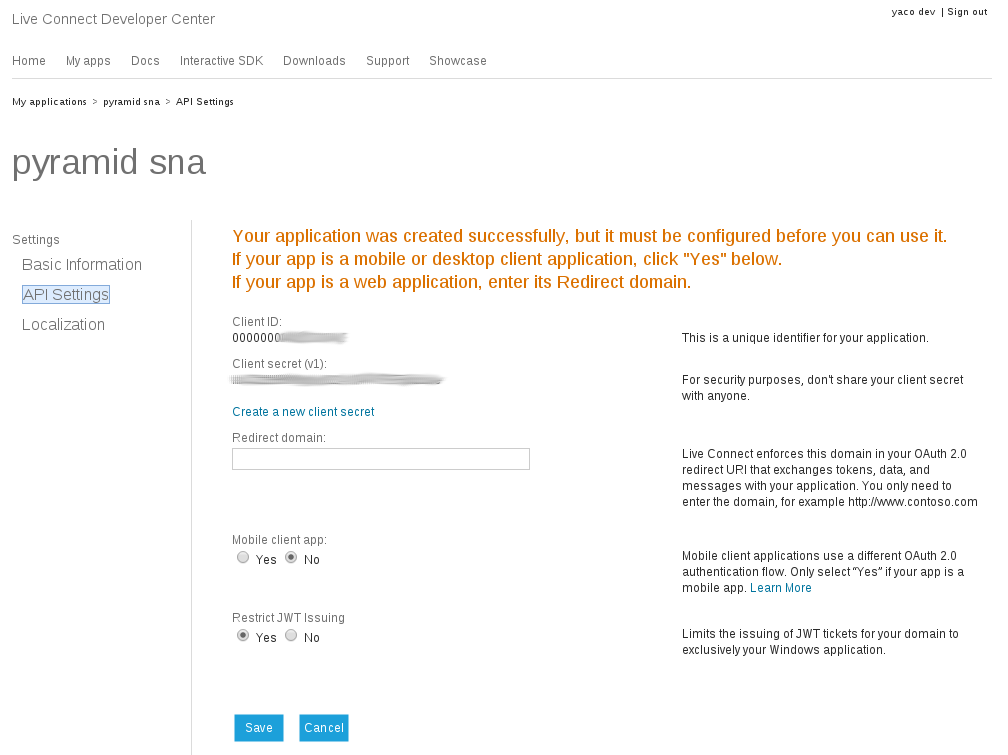
Then the application is created and you are redirected to the main application page where you can see the client id and client secret keys. You should fill up the Redirect domain field to ensure the Live Connect use that domain in your Oauth 2.0 redirects URI. For development purposes you can enter localhost.
After this change you have to click on the Save button.
Configuring the settings
In pyramid_sna there are some required settings and some optional settings.
If any of the required settings is disabled a boolean settings called liveconnect_auth_enabled will be set to False.
Also if the required settings are missing the views that handle the authentication process (‘liveconnect_login’ and ‘liveconnect_callback’) will not be registered.
Required settings
There are 3 required settings:
- liveconnect_client_id this should be set to the Client ID value obtained while registering your application in the Live Connect Developer Center site.
- liveconnect_client_secret this should be set to the App Secret value obtained while registering your application in the Live Connect Developer Center site.
- liveconnect_callback this should be set to the full path to a Python function that will be called after a succcessfull authentication. Check the next section Writing the callback function for more information about this function.
Optional settings
The following settings have sane defaults so you shouldn’t ned to change them in most cases:
- liveconnect_scope is space separated list of scopes. In OAuth2 a scope indicates what permissions are given to an application. The default scope includes the email permissions: wl.basic wl.emails. Check documentation in the Live Connect Developer Center site to learn about available scopes.
- liveconnect_auth_uri is the URL where the OAuth2 authentication endpoint is located. Its default value is https://login.live.com/oauth20_authorize.srf and you should not change it unless Microsoft change it.
- liveconnect_token_uri is the URL where the OAuth2 token endpoint is located. Its default value is https://login.live.com/oauth20_token.srf and you should not change it unless Microsoft change it.
- liveconnect_basic_information_uri is the URI where the user information endpoint is located. This is called by pyramid_sna to fetch user attributes after a successfull authentication. Its default value is https://apis.live.net/v5.0/me and you should not change it unless Microsoft change it.
Example configuration
The following is an example configuration for the Microsoft Live Connect provider that will looks similar to what you should put in your .ini configuration file:
# Microsoft Live connect authentication
liveconnect_client_id = 0000000012345678
liveconnect_client_secret = aaAA1234123412341234123412341234
liveconnect_callback = my_project.sna_callbacks.liveconnect_callback
Please note that these are not valid values and you should not copy and paste them into your project. They will not work.
Writing the callback function
The callback function is called by pyramid_sna after a succesfull login with Microsoft Live Connect. The arguments that are passed to this function are the request object, the Microsoft Live Connect user id and a dictionary with user attributes (screen_name, first_name, last_name and email address). This function should return a Pyramid Response object which will be send to the user’s browser.
The typical things that a callback function does are:
- Create or update a user object in the application persistent storage.
- Call pyramid.security.remember to create an authenticated session for this user.
- Returns an HTTPFound object to redirect the user to an application view.
Example that persist the user in MongoDB:
from pyramid.httpexceptions import HTTPFound
from pyramid.security import remember

def liveconnect_callback(request, user_id, attributes):
    # Create or update the user in MongoDB
    user = request.db.users.find_one({'liveconnect_id': user_id})
    if user is None:
        user_data = {'liveconnect_id': user_id}
        user_data.update(attributes)
        user_id = request.db.users.insert(user_data)
    else:
        request.db.users.update({'liveconnect_id': user_id}, attributes)
        user_id = user['_id']

    # remember the user by sending a cookie
    remember_headers = remember(request, str(user_id))

    # return a redirect response to the home page
    return HTTPFound(location='/', headers=remember_headers)